

Login
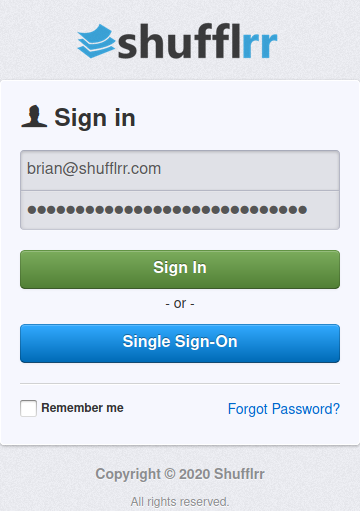
Go to your designated URL on the Shufflrr cloud, site_name.shufflrr.com, where site_name is your or your company’s Shufflrr site name.
Your username is your email address.
Your password is created and sent to you from Shufflrr when you are added to the library. Alternatively, you can request a new password.
Home Screen
Shufflrr is optimized for tablets and smartphones. The screen will adjust to fit your window.
Files View
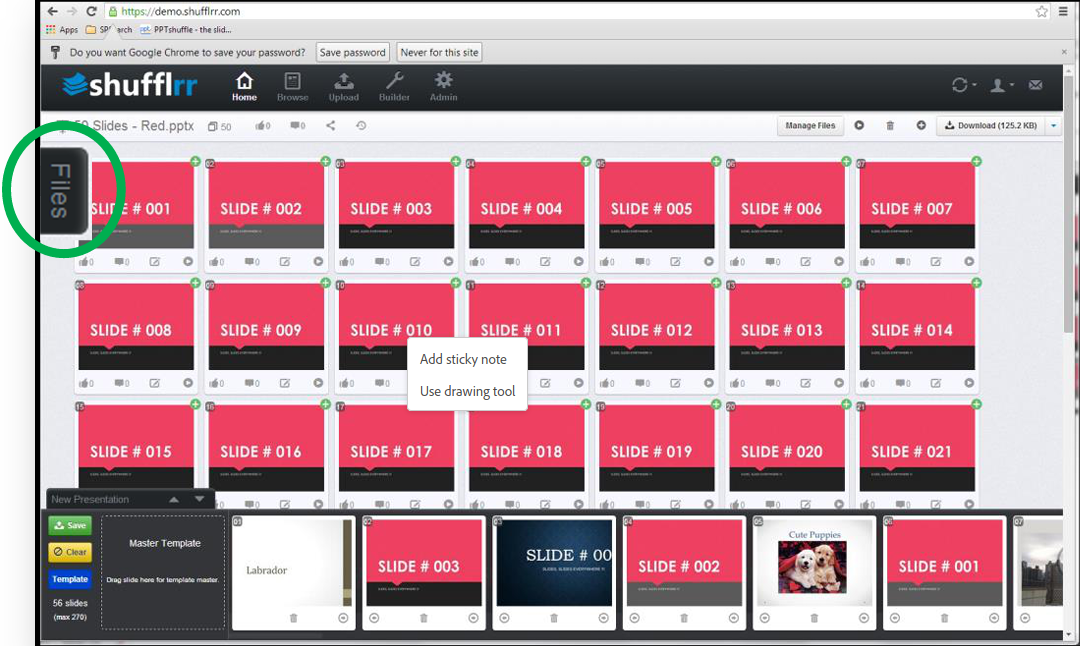
You Files View navigation bar slides on and off the screen, leaving more room to see more slides. Click on the Files tab to slide the files view on and off the screen.
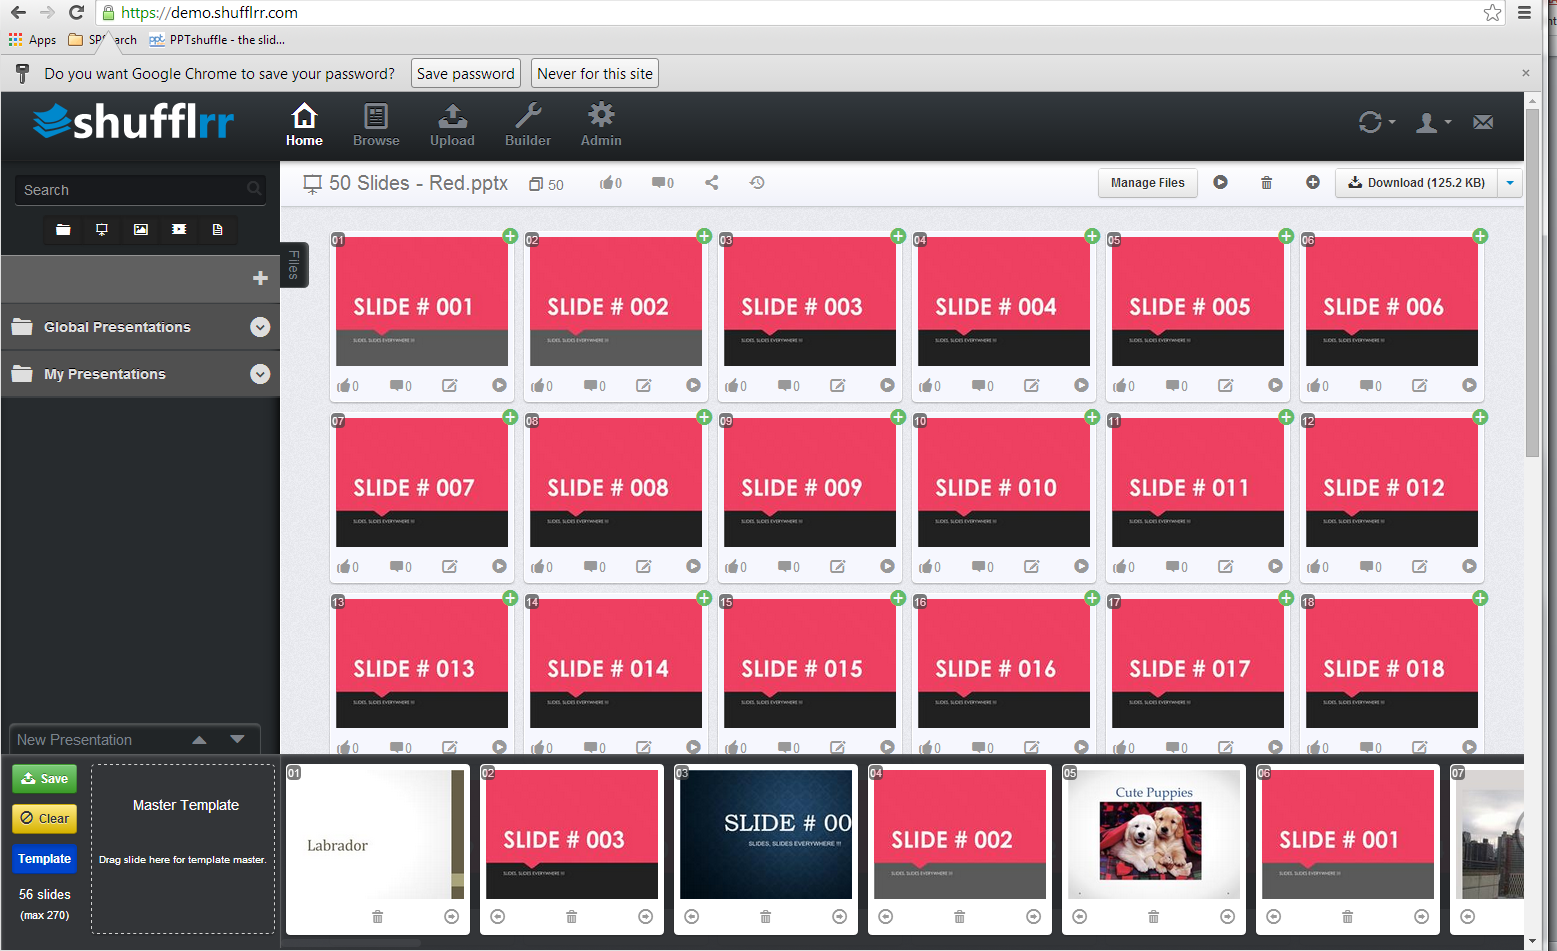
Files view open – Where you can see all of your files. Click on the folder to view the files within.
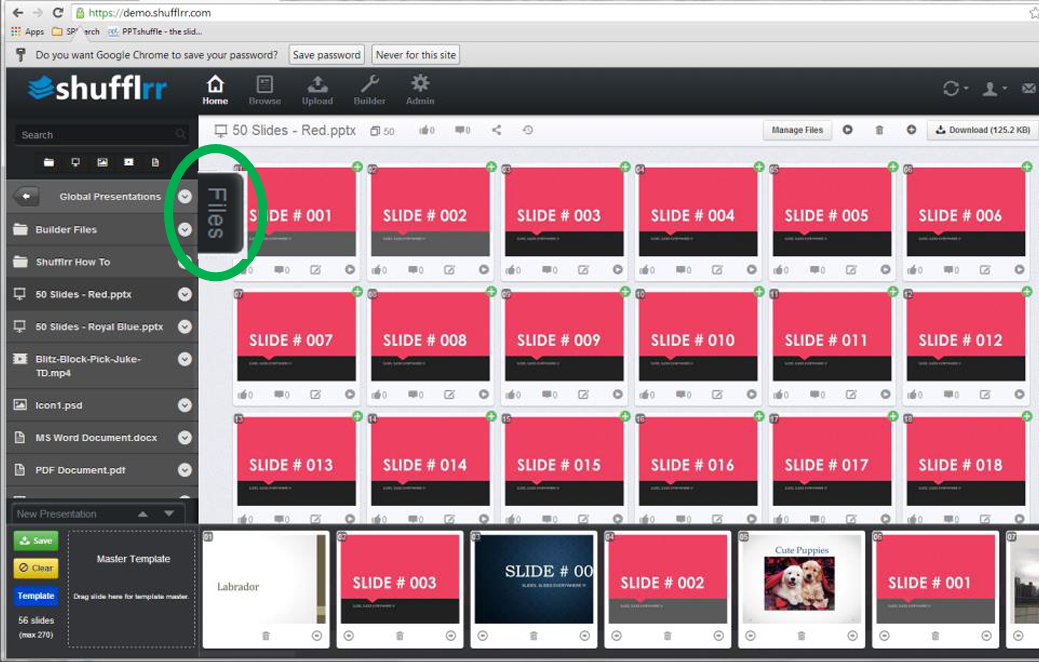
Files view closed – Leaves more space to view more slides.
New Presentations
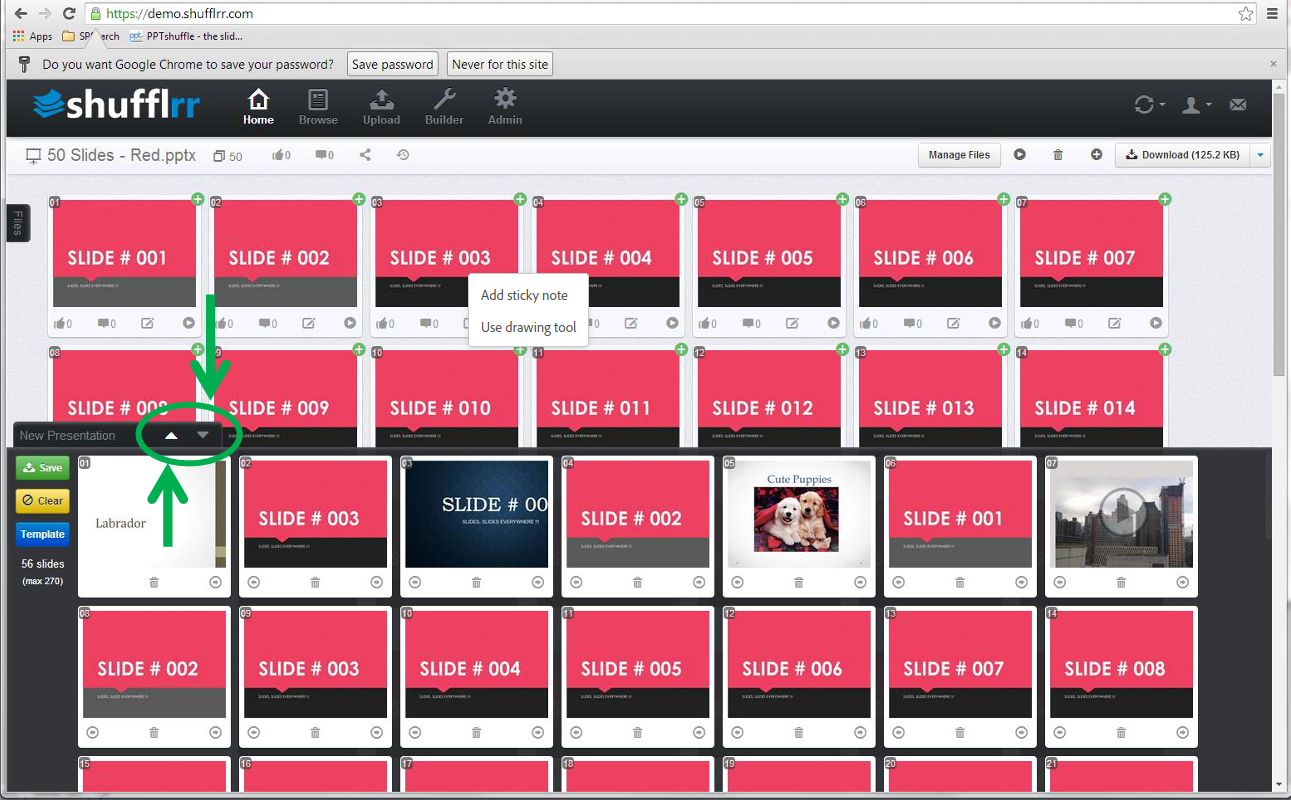
The New Presentations window is at the bottom of your screen, and it can expand so you can see more slides, videos and other files as your create your new presentation. To expand the window, click on the up arrow, to minimize the new presentations window, click on the down arrow.
Browse View
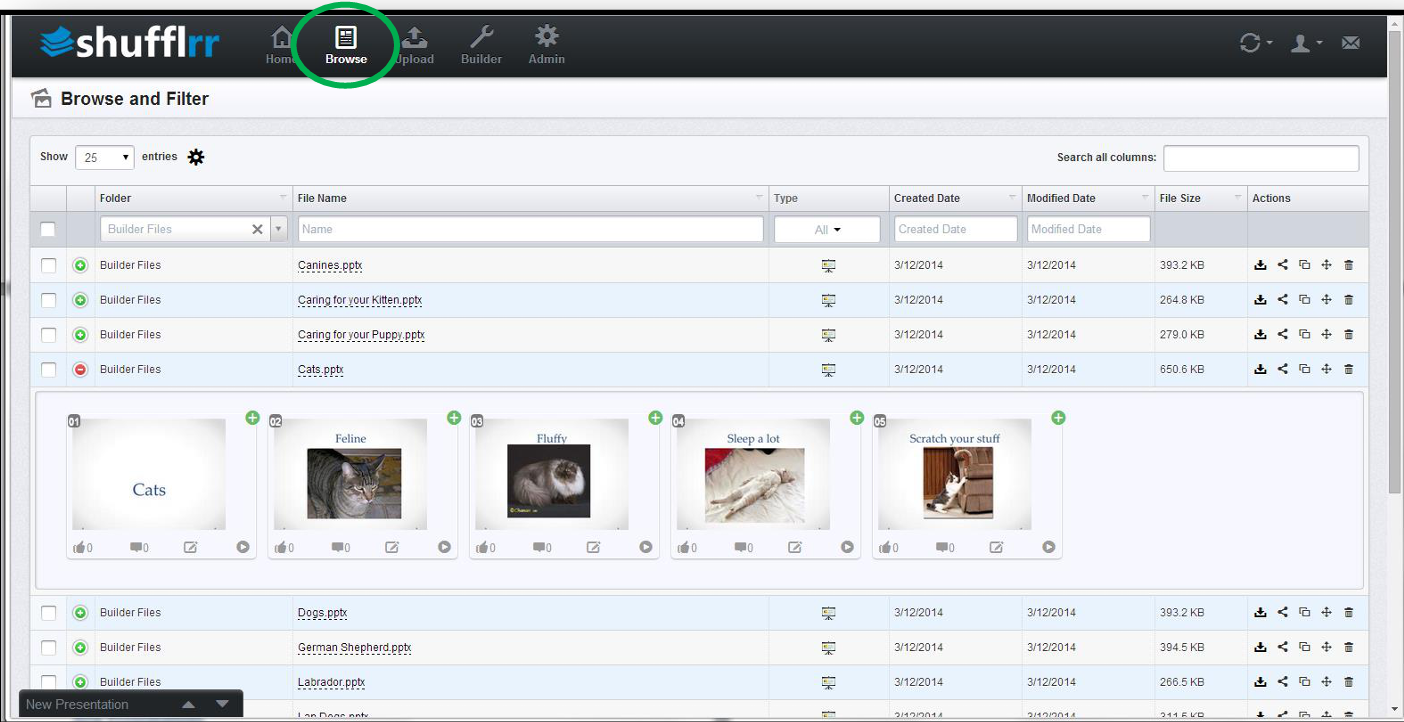
Browse view allows you to see all files on one page. You can sort by folder and file properties. You can also drag and drop slides or entire files into the New Presentation window at the bottom of your screen.
Multiple File Actions
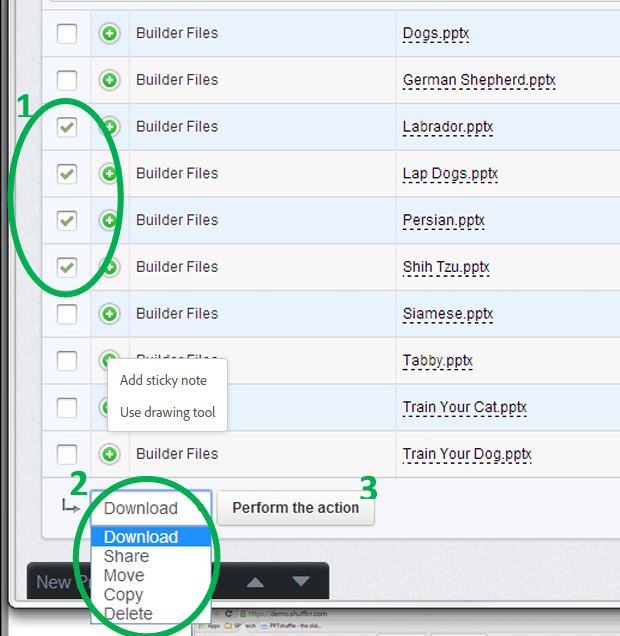
In the Browse view, you can perform actions on multiple files, at one time.
- Select the file(s) by clicking the check box. You can choose one or more
- Choose the action from the drop down menu at the lower left, bottom of the screen
- Download
- Share
- Move (to another folder)
- Copy (to another folder)
- Delete
- Click the “Perform Action” button
File Types Supported
Any file format can be stored in the Shufflrr, except for executables (.exe) which pose a security risk.
The following files can be previewed and added to a new presentations:
- PowerPoint
- MS Office (i.e. Word, Excel, PowerPoint)
- Images – JPG, BMP, PNG, GIF
- Video – WMV (recommended), MOV, MPG, AVI, M4V
- PSD – will just show the first layer
The following can be stored only:
- Audio – WAV, MP3
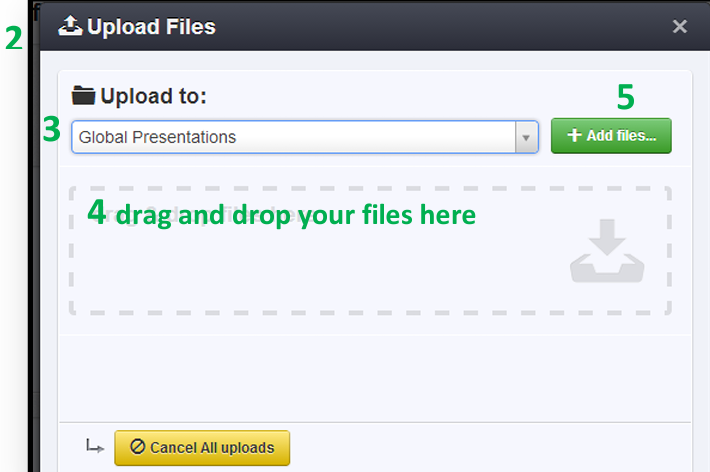
Upload Files
- To upload a file, click on the Upload icon at the top of the screen.

- A window will slide down
- Select the folder in which you want to save your files.
- Drag and drop one or more files into the window which will automatically start the uploading process.
- Add Files button, will open a file chooser where you can pick a files individually (It’s old school upload).
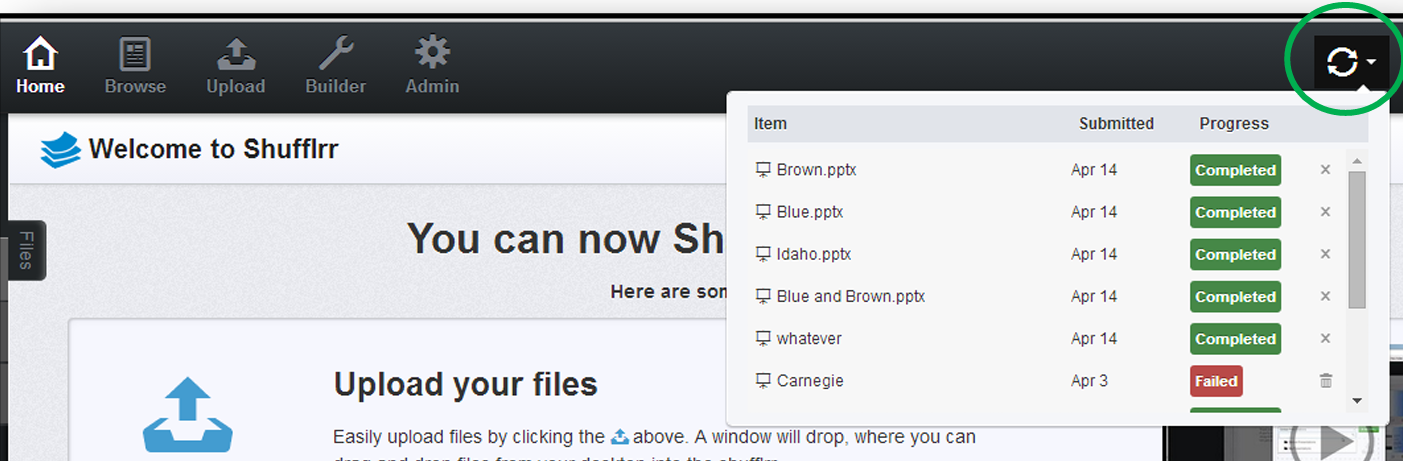
- Files that are in the queue, are being processed by the Shufflrr server. This is where slides get indexed for search, thumbnails are created, videos are re-rendered, etc. for use in the Shufflrr. This process happens in the background, so you can still work in your Shufflrr while your files are uploading.
Search
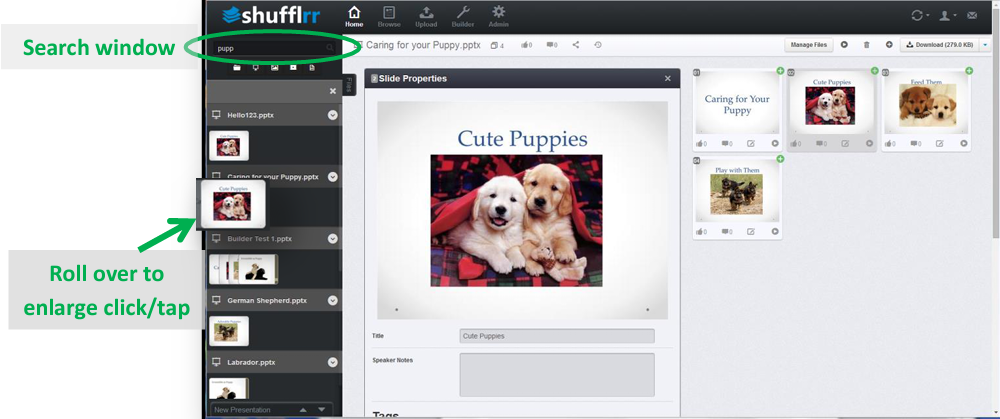
Search PowerPoint
PowerPoint files and slide are searchable by file name, slide title, text, speaker notes and meta tags (which are added through Shufflrr.) To search, input your keywords in the Search window, at the top of the Files View. As you input letters or numbers, results will appear, with the file name and slide thumbnails. Roll over to enlarge the thumbnail. Click/tap the thumbnail to view the full presentation in the Presentation View.o
Search Video and Other File Formats
Video and other file formats are searchable by file name and meta-tag.
Creating a New Presentation
You make a new presentation, a PPTX file, from complete PowerPoint files, individual slides, videos, PDF files and MS Office files, like Word and Excel. You can add them all to a new file, determine the order, and then save it out as a new PPTX file that you can then download, send and present live.
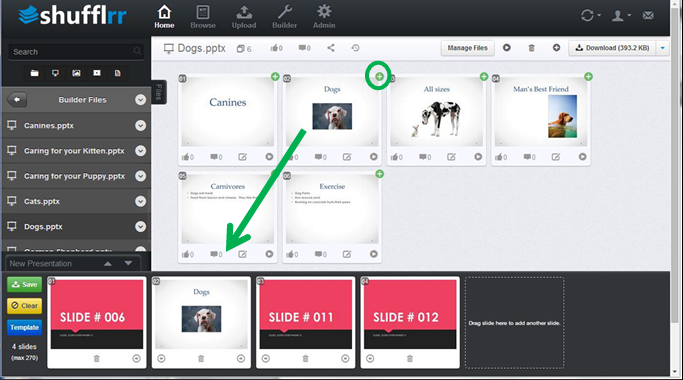
Add a slide to a new presentation
Select the slide from the preview window, and drag and drop it down to the New Presentations window at the bottom of the screen.
For tablets or smart phones, tap the '+' in the upper-right corner of the slide thumbnail.
Add two or more slides to a new presentation at once
Like most programs, hold the Shift Key and click on the slides you want to add. Then drag and drop them into position in the New Presentation window. If they are in a sequence, you can click the first and last slide of that sequence, and all the slides in between will be selected.
For multiple slides, that are not in a sequence, hold the Ctrl Key and click on the slides you want to add. They will highlight in gray. Then drag and drop them into the New Presentation window.
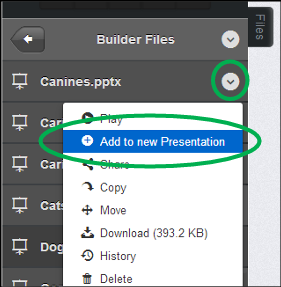
Add an entire presentation to a new presentation
In the Files View, click or touch the drop down icon, next to the file name, and select Add to New Presentation. This will take the entire file and add it to your new presentation.
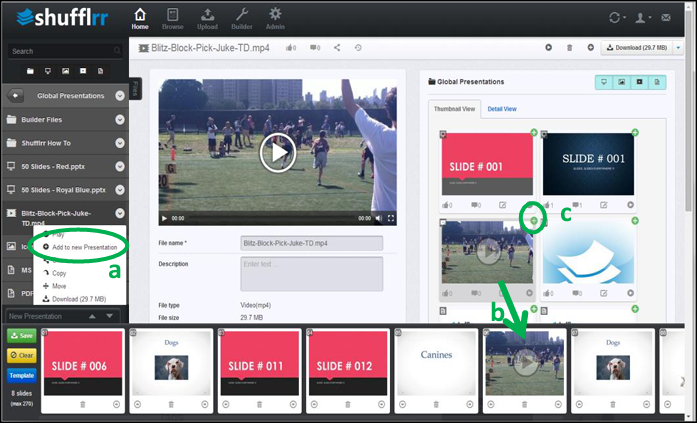
Add a video to a new presentation
Video embedded in a slide – Add the slide to the presentation (see 1 and 2) and the video, with all its properties will follow.
Video file – When a video file is added to a new presentation, Shufflrr will automatically format it to run as a full screen slide in PowerPoint. All you have to do it add it. There are a three ways you can add a video.
- a) In the Files View, click or touch the drop down icon, next to the file name, and select Add to New Presentation.
- b) In the Preview, drag and drop the video file
- c) In the Preview, click/touch the '+' in the upper-right corner of the video thumbnail.
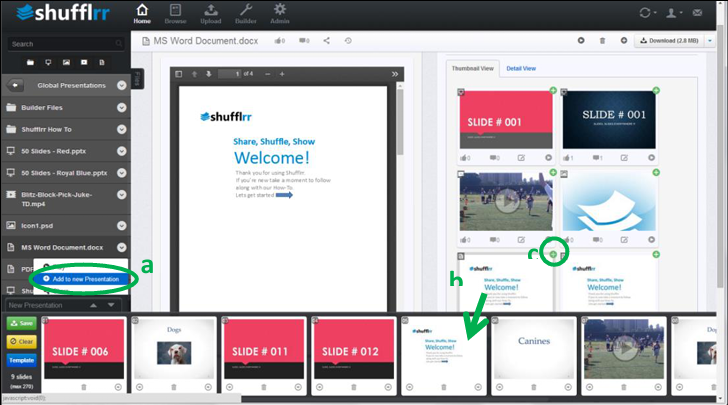
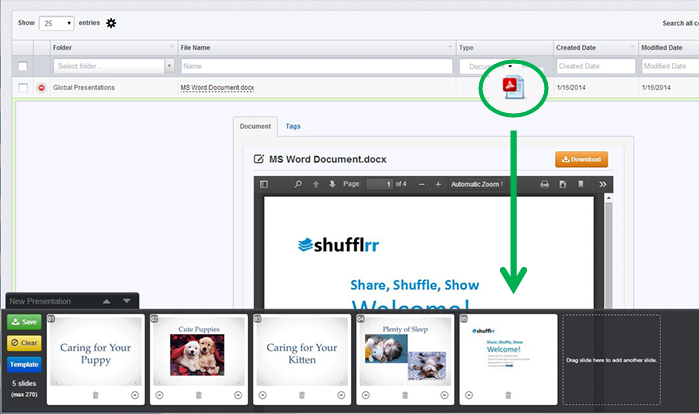
Add a Word or PDF file to a new presentation
When an MS Word or PDF file is added to a new presentation, Shufflrr will embed the file into the new PowerPoint.
- a) In the Files View, click or touch the drop down icon, next to the file name, and select Add to New Presentation.
- b) In the Preview, drag and drop the file
- c) In the Preview, click/touch the '+' in the upper-right corner of the thumbnail.
Add an Excel spreadsheet to a new presentation
When an Excel file is added to a new presentation, Shufflrr will embed the entire file, but you will only be able to view the first worksheet in Shufflrr’s theater and PowerPoint Slide Show modes.
- a) In the Files View, click or touch the drop down icon, next to the file name, and select Add to New Presentation.
- b) In the Preview, drag and drop the file
- c) In the Preview, click/touch the '+' in the upper-right corner of the thumbnail.
Save a Presentation
After you have added all of your slides and files to your new presentation, and put them in the order you wish to present, save the file.
- a) Click/Tap Save to the left of the New Presentation window.
- b) A new window will appear where you will be prompted to name your file and select a folder,
- c) Click Save.
- d) The file will queue until it is finished.

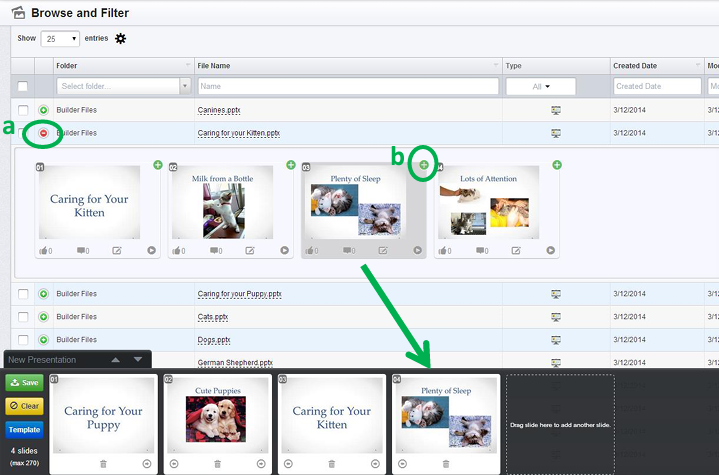
Add slides to a new presentation from the Browse view
- a) View the slides in the PowerPoint file, by clicking on the '+' next to the folder name.
- b) Drag the slide into position, or click tap the '+' button in the upper right corner of the thumbnail.
Note: To take multiple slides at once, use the Ctrl and or Shift key commands
Add files (Office, PDF, video) to a new presentation from the Browse view
Click and drag or tap the file icon, located in the File Type column to add an MS Office, PDF, video or other file type to your presentation.
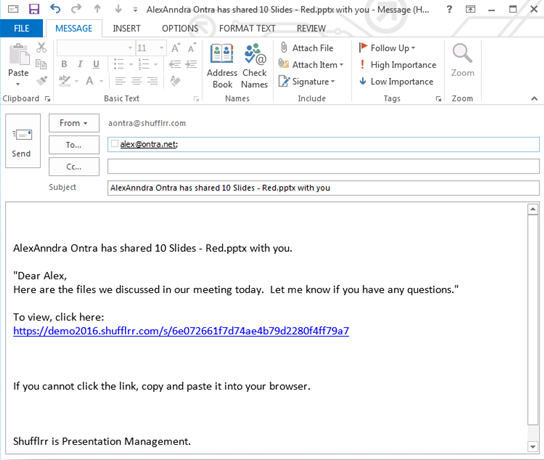
File Share
You can email links to files where your recipients can view online, or download the file. You can share any file type this way: PowerPoint, Image, Video, Excel, PDF, etc.
Send a link to one file
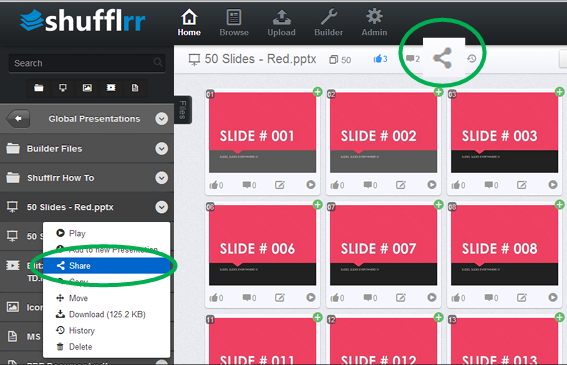
Select the file you would like to share.
Select “Share” from the drop down menu in the Files View window. Or Click the Share icon at the top of the Preview Window.
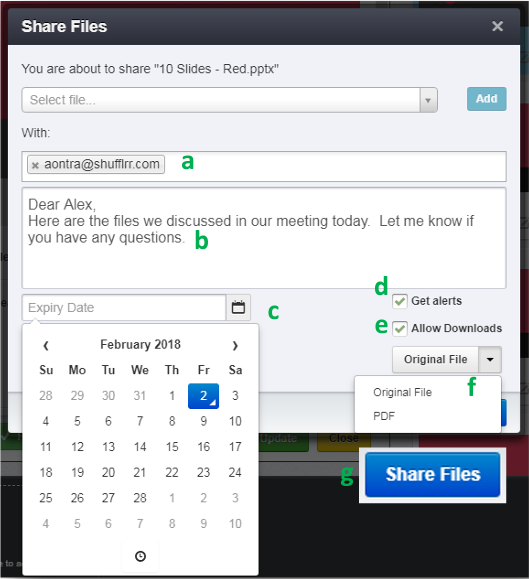
A window will open where you can:
-
a) Type in one or more email addresses for your recipients
-
b) Input a personal note
-
c) Select an expiration date. Upon expiration the link you send will no longer be active. If someone clicks on that link they will get a “page expired” message.
-
d) Choose if you’d like to get real time alerts when your recipient views or downloads the file
-
e) Choose if you’d like to give the recipient permission to download the file
-
f) Choose if you’d like the recipient to access the file in original file format or a PDF version.
-
g) Then click, Share Files.
- NOTE: If you completed step a) and input an email address, then Shufflrr will send out your email. The recipient will receive an email from the Shufflrr server. Sometimes, corporate networks will block or filter an automated email. To avoid getting your shared file blocked, leave the email address blank. Click Share Files.
-
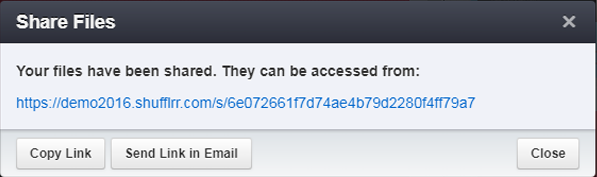
h) You will then be given the option to Copy the Link or Send Link in Email
-
Copy the Link: When you copy the link, simply open your email or other document and select Ctrl V (on PC) or Command V (on Mac). It will then paste that long unique identifier web address.
-
Send Link in Email: When you opt to send a link through Email, Shufflrr will trigger an email to open using your default email program pre-populated with your message and link to the file. Then, you can send the link directly from your personal email.
-
Note: When PowerPoint files are updated through Shufflrr’s slide updating feature, the updates will carry through to shared links. This is only for PowerPoint files. For updates to PDF, Word, Excel, Video and other file formats, you must update and resend the link.
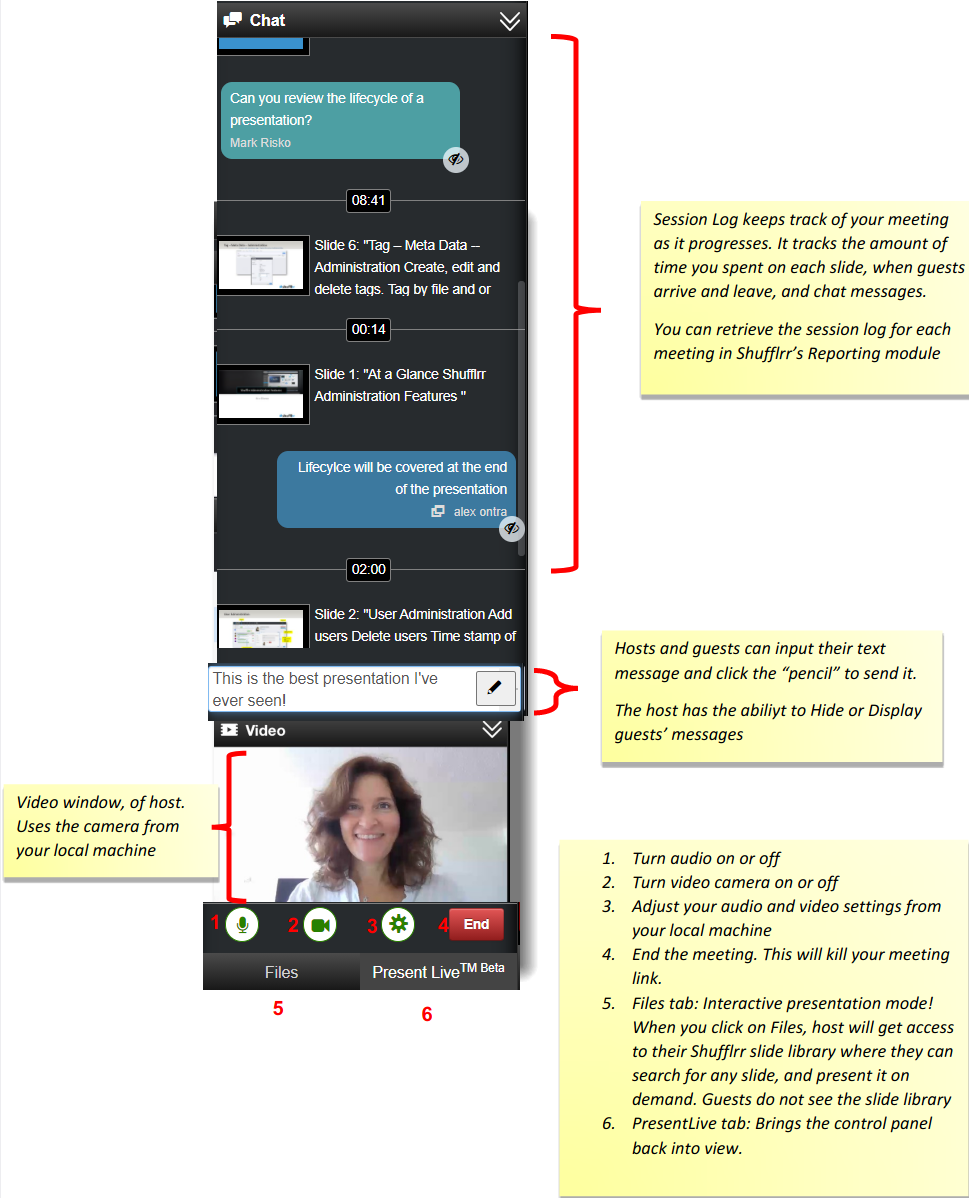
Present Live™
Present Live lets you broadcast a meeting with audio/video and complete access to your Shuffrr slide library. It give the presenter complete control over the content and audience participation. It’s where content meets communication.
- To get started, select your presentation or slide, click Play.
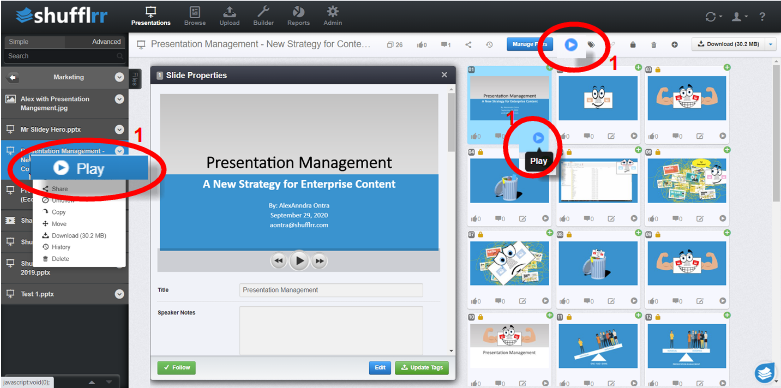
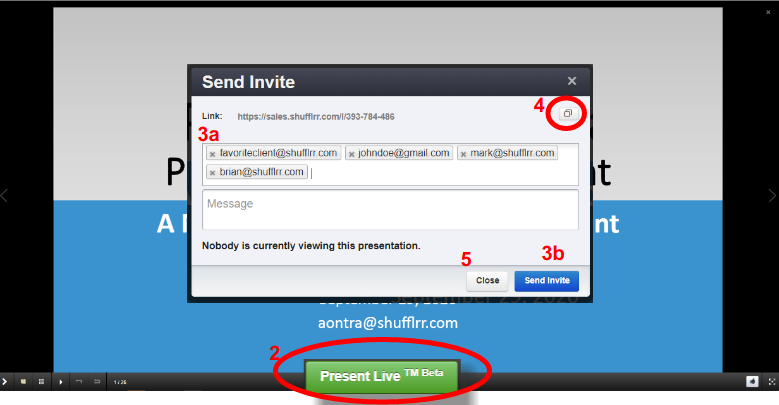
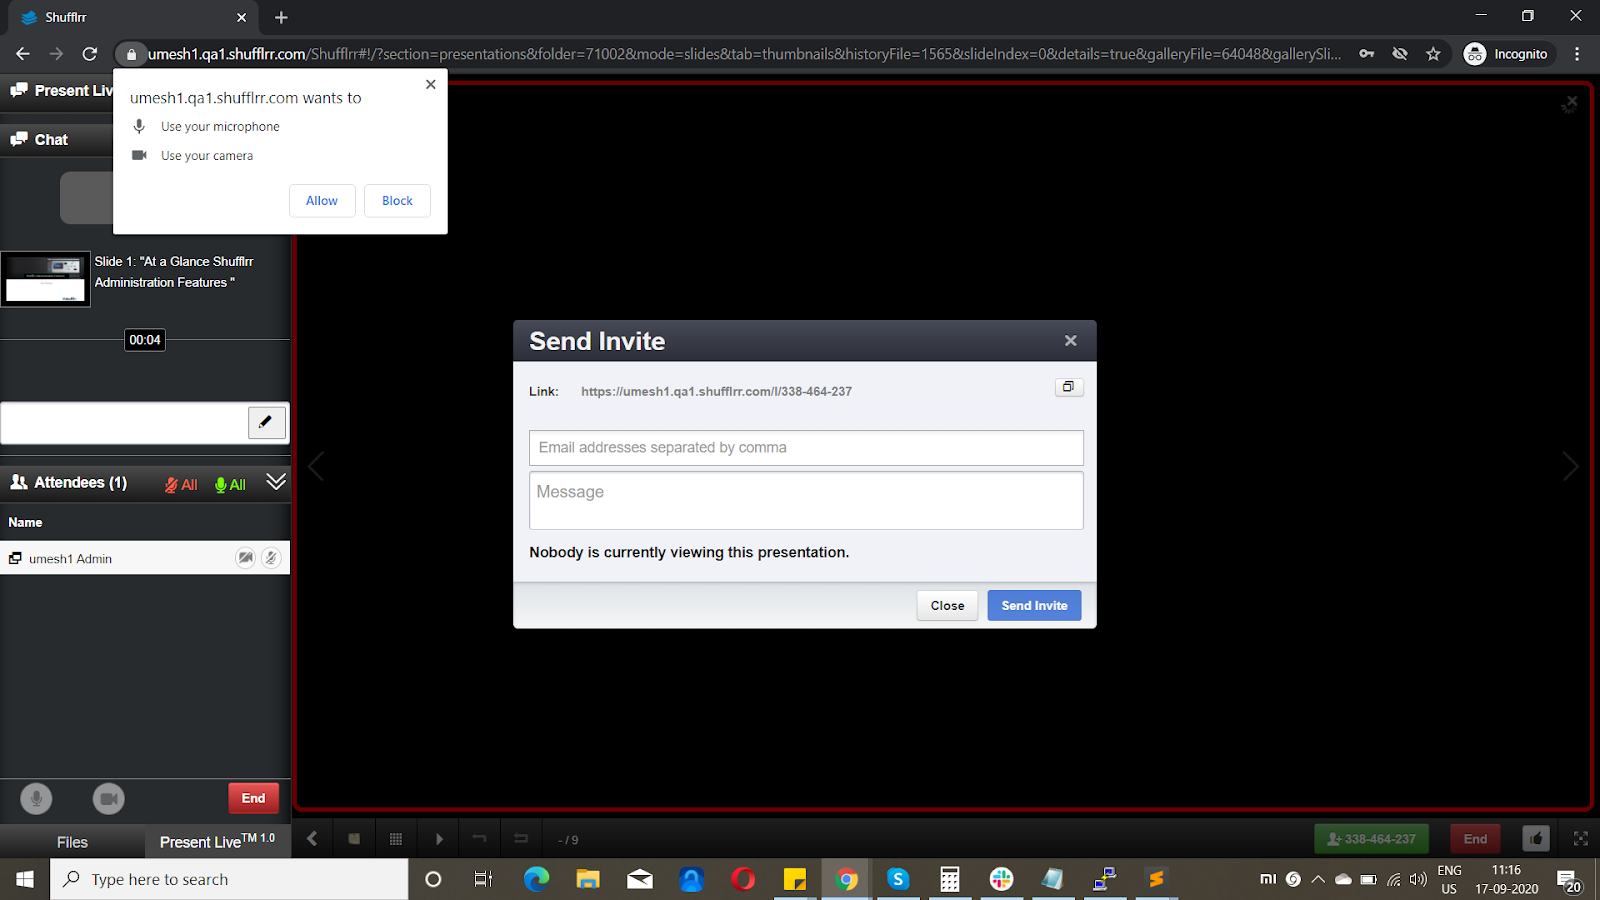
- Shufflrr will go into full screen present mode. At the bottom of your screen, select the green PresentLive button. A drop down window will appear.
- To send an invitation directly from Shufflrr:
- Type in the email addresses of your guest(s), click the “space bar” to enter. You can invite as many guests as you’d like.
- Click “Send Invite” and Shufflrr will send an email to the email addresses that you entered.
- To send an invitation from your own personal or professional email account, select “Copy Link” and paste the link into your own email correspondence.
- When you are finished emailing and inviting guests, select Close. You are ready to start your meeting
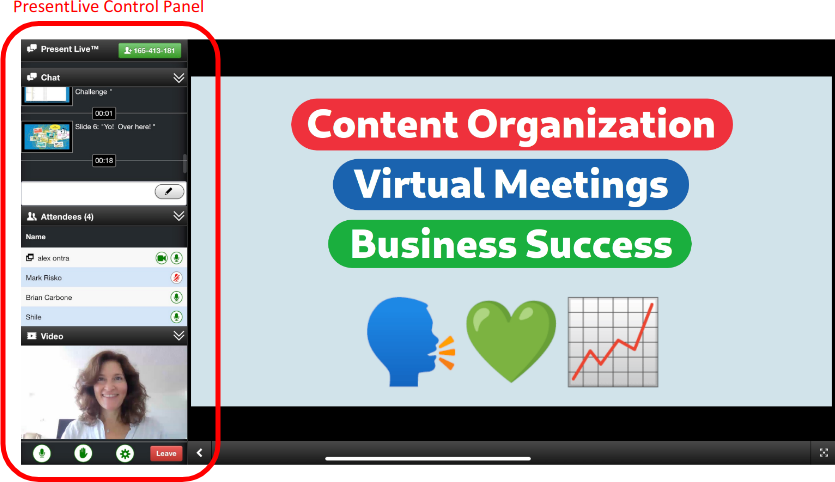
Now you can start broadcasting. Your control panel is to the left of your screen.
Present Live™
Present Live™ is beta software.
Thank you for using Present Live to hold important remote meetings. Please review the following information to make your experience as seamless as possible. Feedback is important to us; please provide your thoughts and questions using the feedback center in your organization's portal.
Browser Compatibility
| Windows | Mac | iOS | |
|---|---|---|---|
| Chrome | Yes | Yes | No |
| Firefox | Unstable | No | No |
| Edge | Yes | Unverified | N/A |
| Safari | N/A | Yes | Unstable |
| Opera | Yes | Unverified | Unverified |
| Internet Explorer | No | N/A | N/A |
Notes: Mobile devices (running both Android and iOS) currently suffer connectivity issues wherein a presenter or audience members may be inaudible. For the best experience during this beta period, a Chromium-based browser on Windows or Mac provides the most stability.
FAQ
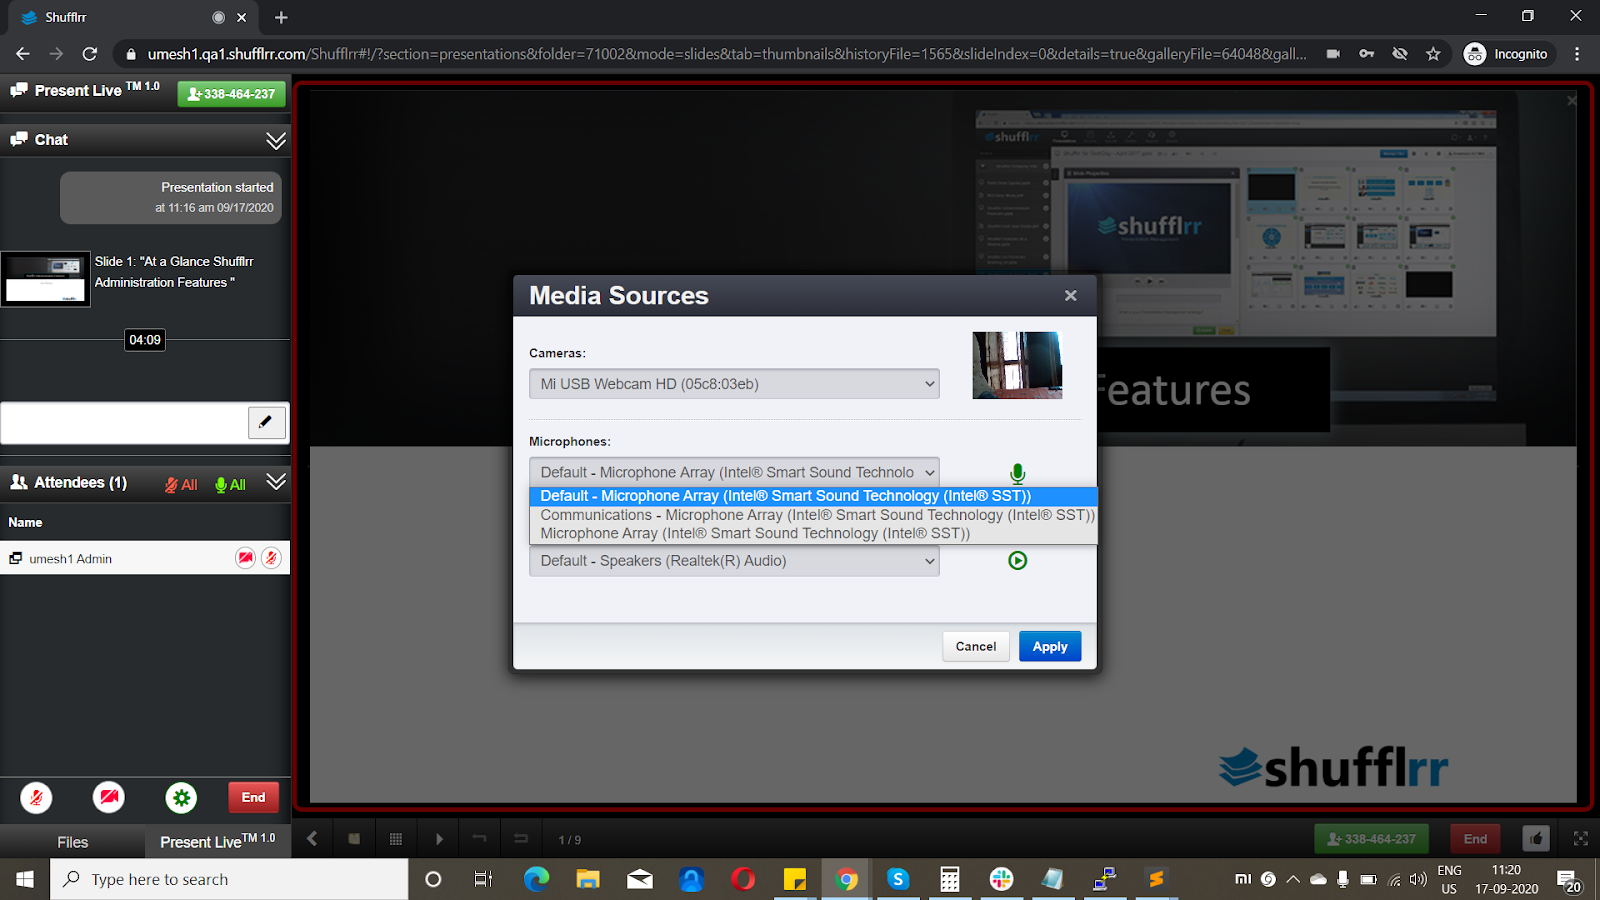
- My audio/video icon remains gray and it cannot be toggled.
- Ensure you have allowed Shufflrr access to audio and video devices in your browser.
- Try refreshing the page or opening the session with an InPrivate session.
- Ensure you have your audio/video device connected and recognized by your operating system.
- Ensure you have allowed Shufflrr access to audio and video devices in your browser.
- My audio/video icon remains red and it cannot be toggled.
- Verify the stability of your internet connection.
- Check your firewall and VPN settings per the table below.
- Try refreshing the page or opening the session with an InPrivate session.
- Review the Browser Compatibility table.
- My audio/video icon is green, but others cannot see or hear me.
- Verify the stability of your internet connection.
- Check your firewall and VPN settings per the table below.
- Select a different device from your media sources settings.
- Try refreshing the page or opening the session with an InPrivate session.
- Try muting/unmuting your audio device using a hardware switch or your operating system.
- Review the Browser Compatibility table.
- I cannot see the presenter's video feed or hear other audience members.
- Verify the stability of your internet connection.
- Check your firewall and VPN settings per the table below.
- Try refreshing the page or opening the session with an InPrivate session.
- Review the Browser Compatibility table.
Firewall/VPN Configuration
Protocols and ports
| Protocol | Port Range |
|---|---|
| TCP | 80, 443, 1935 |
| UDP | 6970 - 65535 |
Domain and IP whitelisting
| Domain | IP Address | Info |
|---|---|---|
| shufflrr.com | ? | Shufflrr's portal |
| turn.shufflrr.com | 52.203.39.5 | TURN server for relaying media |
| 5f29828850432.streamlock.net | 54.211.255.81 | Media server |
Granting Permissions: Sharing Folders
You can create your own sub group and invite your choice of other Shufflrr members to share select documents.
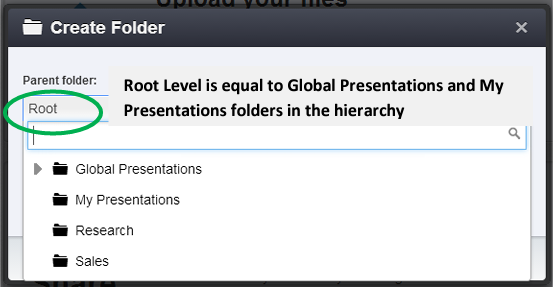
- a) Select the folder you wish to share, and click or tap the drop down window.
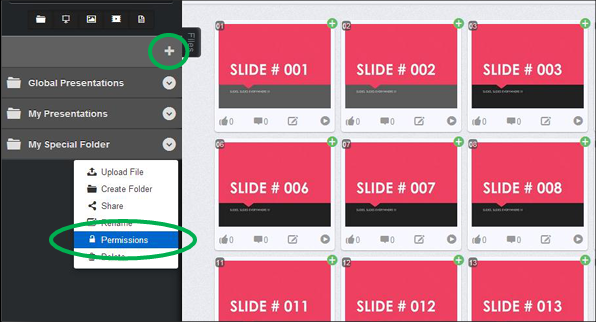
NOTE: Create your new folder at the Root Level, the very top level, to ensure that your users will see it when they login. If you grant permissions to a sub-folder, then you must grant permissions to the parent folder in order for your users to see it.
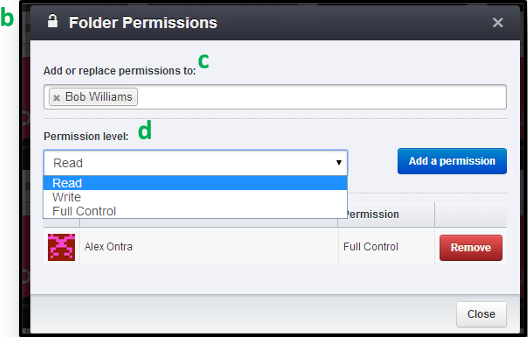
- b) Select Share, a window will appear
- c) Input the users with whom you wish to share your
- d) Assign their rights.
- Read – allows them to view, download and shuffle
- Contribute – allows them to upload, view, download and shuffle
- Full Control – allows them to delete, upload, view, download and shuffle
Social Likes and Comments
Shufflrr makes PowerPoint and other marketing collateral social. You can comment and or like individual slides and files.
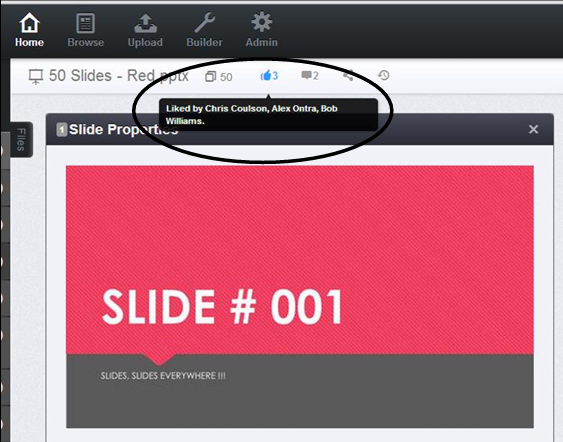
Like Slides and Files
Select the slide or file in the File Preview window, and click the Thumbs Up Icon at the top of the screen. Hover over the Thumbs Up icon to see who has liked it.
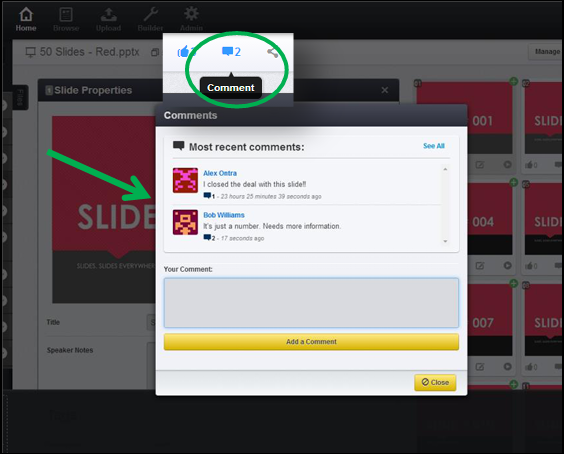
Comments
To read or input your own comments, click on the comments icon at the top of the File Preview window, and a second window will slide down, where you can read through other users’ comments and input your own comments.
Slide Updating
Shufflrr distributes updated slides, so you don’t have to worry about outdated, wrong slides creeping back into presentations. Anyone who has write permissions to a folder can update/overwrite a presentation, and then distribute the updated content to end-users personal presentations (i.e .child presentations that were created using slides from the overwritten presentation). Updates can be forced or you can let the end-user decide whether or not he wants the updated content. And you get a side by side, slide by slide, comparison and recap of the old version versus the new version. You have control over the updated content throughout the process.
Before we get to the step by step instructions, here are a couple of things to note:
Parent and Child Presentations – For the purposes of slide updating, a parent slide and/or presentation is any original or master presentation from which a sub or child presentation has been created. It doesn’t matter to where in the Shufflrr that file was uploaded (i.e. Global Presentations, My Presentations, etc.). It can be anywhere. A child slide and/or presentation is any presentation created with in the Shufflrr, from presentations and/or slides that have already been uploaded into the Shufflrr.
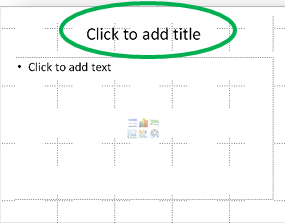
Slide Titles are the basis for comparison – Slides are identified by their title, i.e. Click to add title. When Shufflrr sees a slide with the same title, in the same file name, in the same folder, it will trigger the comparison, and look to see what changes have been made.
Archiving – Don’t worry, if all else fails, you can always roll back to an earlier version of the presentation.
Updating Parent Presentations: Distributing Updates
Anyone who has write permissions to a folder can overwrite a parent presentation. If you can upload to a folder, you can overwrite a file, and therefore, distribute updated slides to all child presentations.
-
To overwrite a file, upload a file with the exact same file name, into the same folder (just like you would on your network). Shufflrr will look to the slide titles, and then look to the content on the slide, comparing the old content to the new content. When it sees different content, it will note that the slide has “changed.”
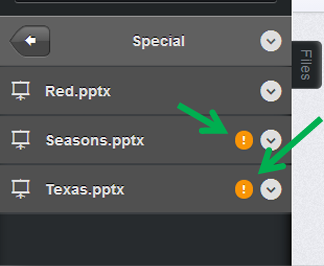
An updated presentation will be identified by an orange circle with an exclamation point next to the file name. In the example (shown to the right) the files, Seasons.pptx and Texas.pptx have changes. Clicking on one of these files will initiate the overwrite process, and force a side by side comparison of old, new and removed slides.
Clicking on a file with the overwrite alert next to it, to begin the overwrite process.
-
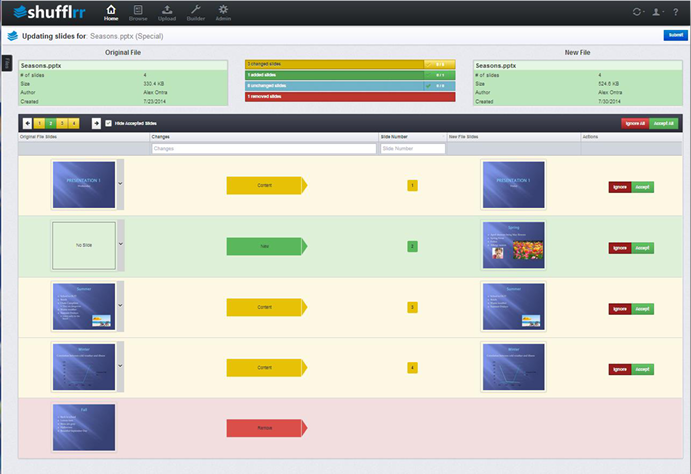
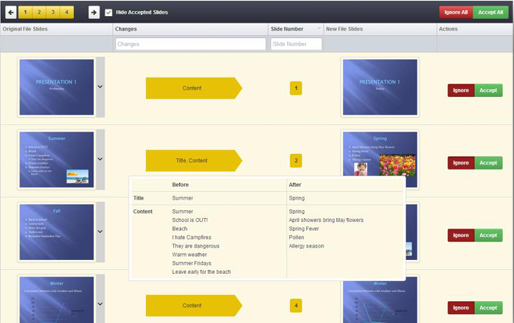
A side by side, or slide by slide, comparison window will open, identifying which slides have changed, stayed the same, been removed or added, when compared to the original file. Again, Shufflrr will look to the slide titles to identify the slides, and begin the comparison process.
-
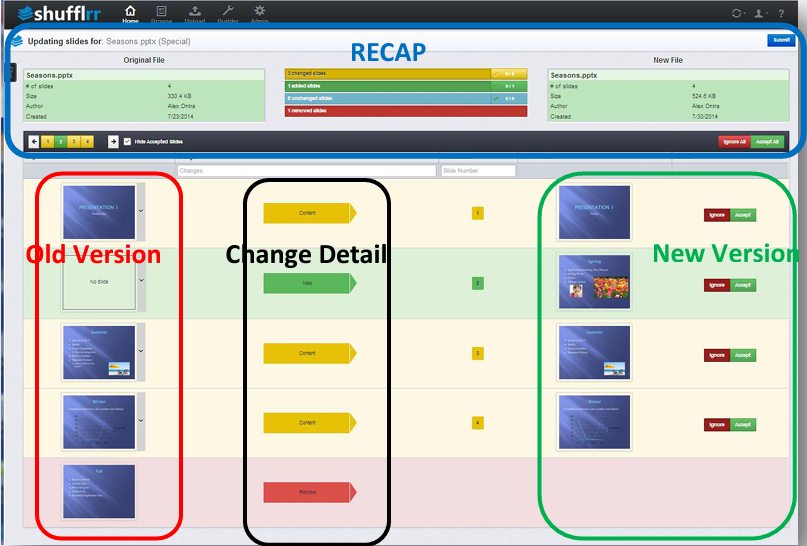
Recap
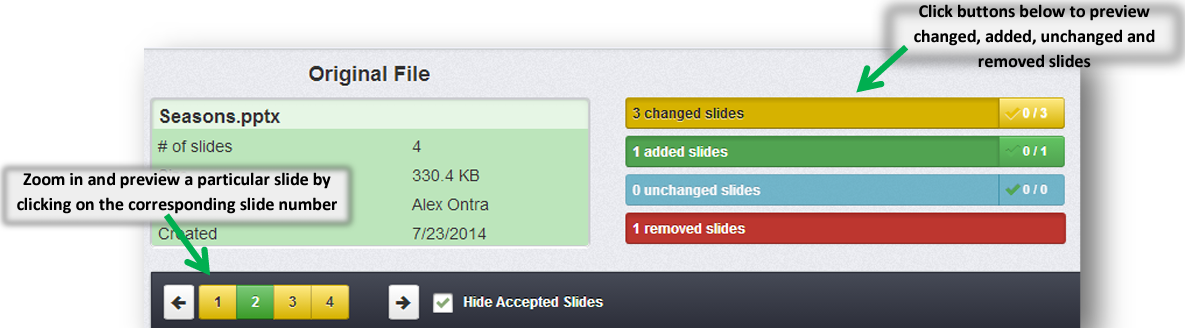
At the top of the screen, you will see a recap of the old versus new file, noting the presentations properties, such as number of slides, size of file, author and date created. The types of changes are color coded. Yellow denotes slides with content changes, green denotes new slides, blue is for unchanged slides, and red is for removed (i.e. deleted slides).
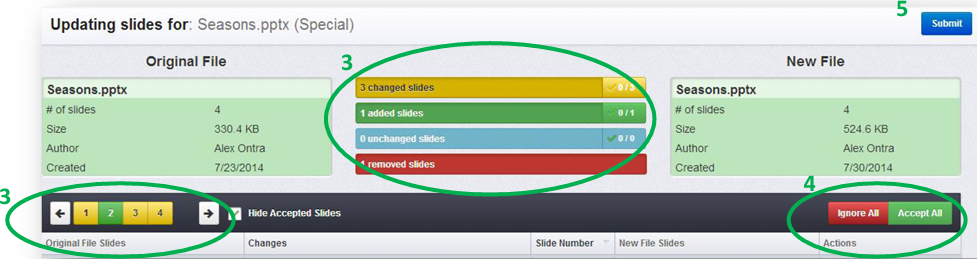
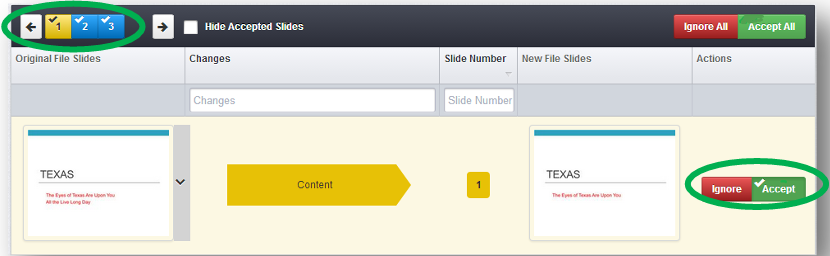
The recap also allows you to zoom into a specific set of slides, for example the changed slides or the added slides, without having to scroll through the entire presentation. And you can even zoom into individual slides, by selecting the slide number.
-
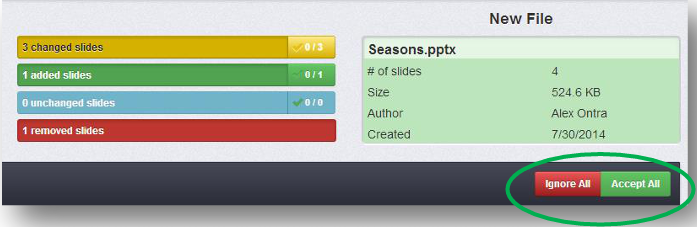
Ignore or Accept Changes
You can approve or ignore all changes in one step, without going reviewing the slides individually, by clicking Ignore All or Accept All buttons at the bottom right of the recap.
-
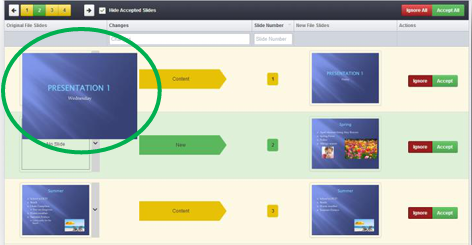
Slide by Slide Comparison
To review the specific slide changes, and Accept or Ignore them individually, simply scroll down and go through each slide. Each type of change is color coded and noted.
- a) Changed Slides – Shufflrr identifies text changes, within text boxes, speaker notes and charts. It does not currently recognize image and video changes. But you can implement those by manually Accepting those slides with the changes.
Enlarge thumbnail by hovering over it with your mouse.
Review hard copy, content changes by hovering over the type of change arrow in the middle.
-
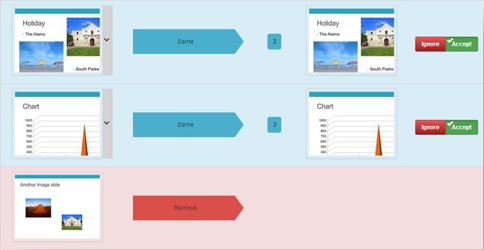
b) Removed Slides – Removed slides are identified, but you cannot accept or ignore the change within Shufflrr. If you accidentally removed/deleted a slide from your updated presentation and want to reverse it. You have three options.
- Change the file on your local computer. The, re-upload.
- Download the original file from Shufflrr. Edit your changes, and then re-upload.
- Use the Archive/History feature to roll back to an earlier version
-
c) Added Slides – New slides will appear in the parent presentation, but will not, cannot, be pushed out to child presentations, as they do not exist in child presentations. In that case of Added Slides, there is nothing to update.
-
d) Unchanged Slides – That’s easy. There are no changes, so there is no action to take.
-
e) Accept or Ignore Change – After you have reviewed a slide, choose the Accept or Ignore button to the right of the updated slide. A check mark will appear, and the corresponding slide number will also have a check mark
-
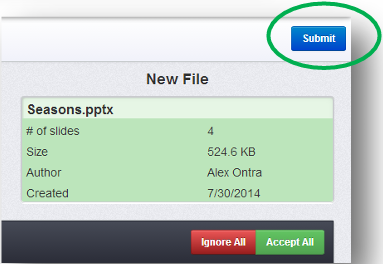
Submit
- a) When you have reviewed all of your slides, and have accepted or rejected/ignored slide changes, click Submit which will start the process of distributing the changes out to child presentations.
- b) Choose Automatic or Manual Updates.
Automatic updates – Force the changes into child presentations. The end-user is notified of the change via email. When he logs into Shufflrr, the updated presentation will be ready for us.
Manual updates – Allow the user to review the side by side, slide by slide, comparison described in the previous steps 5 and 6, and choose whether or not he wants to take the updated slides, or leave his presentation in its original form.
NOTE: If the end-user ignores the update, then the parent – child relationship is broken, and that slide will no longer receive updates when/if that parent receives another update in the future.
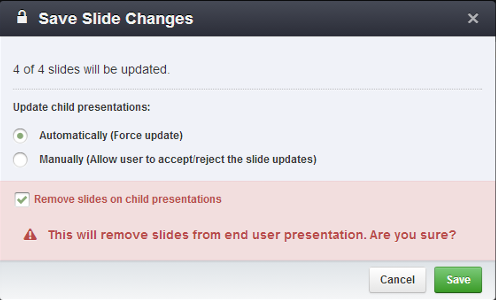
Remove slides – The Save Slide Changes window prompts a the user to confirm whether or not he wants to remove/delete slides from child presentations. Deleting an entire slide, from someone else’s presentation, could prove problematic for that person. So, Shufflrr just asks a second time to be extra sure.
Presentation Builder
The Presentation Builder is a Wizard that groups slides according to subject matter, presents them in a hierarchy, and assembles them into a logical flow of information. For end users, it is a faster, easier to way create a new presentation. They just choose their topics and the rest is done automatically for them. For Administrators, i.e. marketers and compliance officers at the home office, it is a means ensure brand and message compliance.
A Presentation Builder is made up of (usually) short PowerPoint files. A Core deck, and supporting modules.
Foundation Presentation – Mandatory slides, required when presenting about a certain topic. The Core deck serves as the anchor for your builder.
Modules – Optional slides the end-user can select as he creates his presentation. They are put in an assigned position, in relation to the Core Deck.
Sub-Modules – Optional slides that the provided based on the end-user’s choice of Module. They are put in an assigned position, in relation to the Sub-Module.
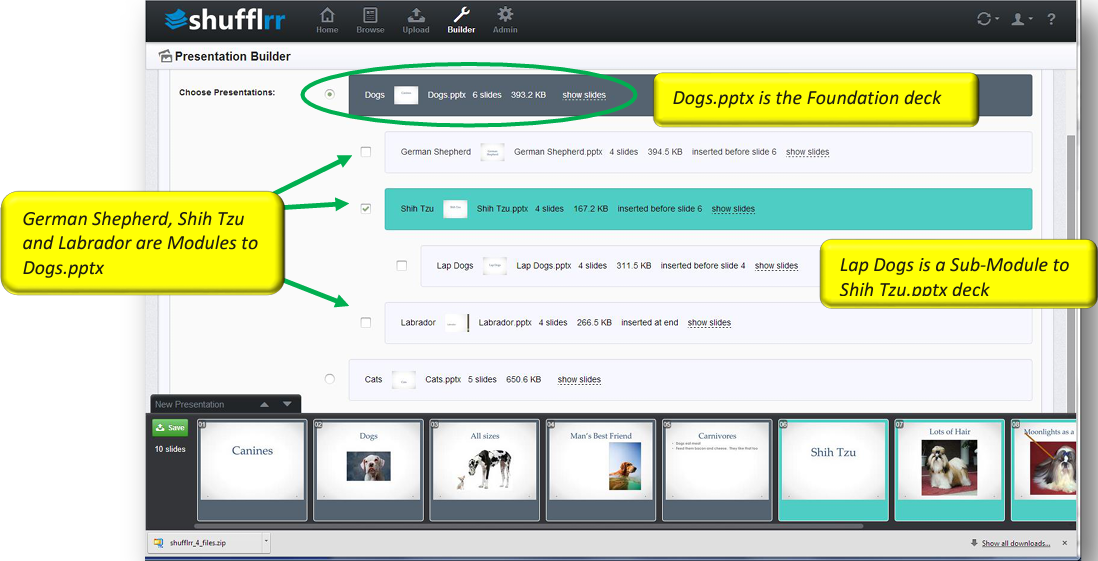
The example below is a Presentation Builder on the topic of Dogs, where Dogs is the core deck, breeds of dogs serve as choices of Modules, and Lap Dogs serves as a sub-module to Shih Tzu.
Setting up a Presentation Builder - For Administrators
-
Go to Admin > Builder
-
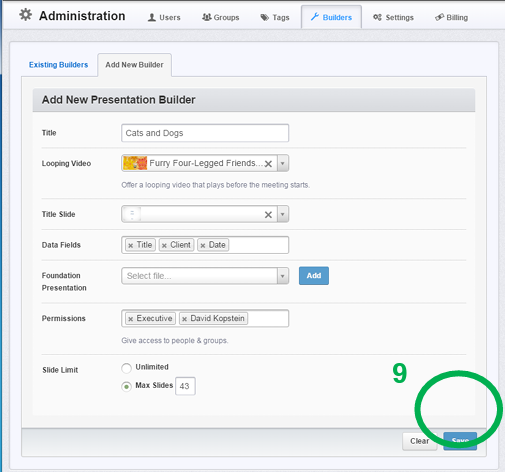
Select Add New Builder
-
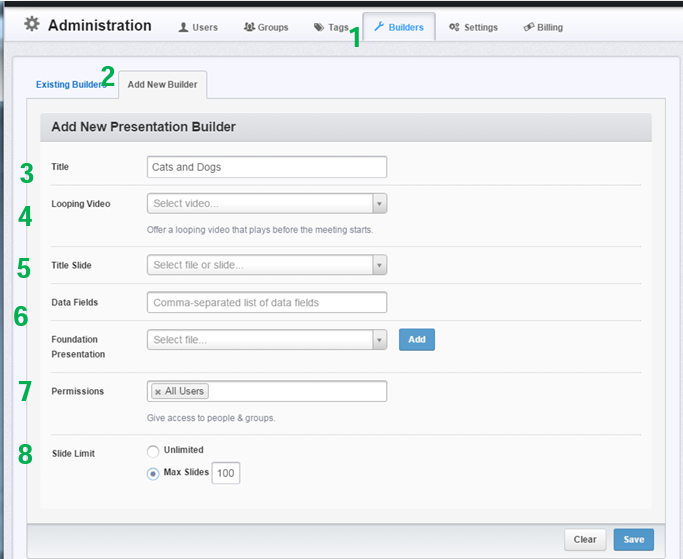
Enter a descriptive name for your builder, so your end-users can readily identify it, eg: Cats and Dogs
-
Optional: Looping Intro Video
Give your end-users the option of including an opening video with their presentation. Click in the Looping Video browser window, and select a video file from any of the folders, files within your Shufflrr site.
NOTE: All files must be uploaded to Shufflrr before you create your builder.
If you don’t want to include a video, just skip this step.

-
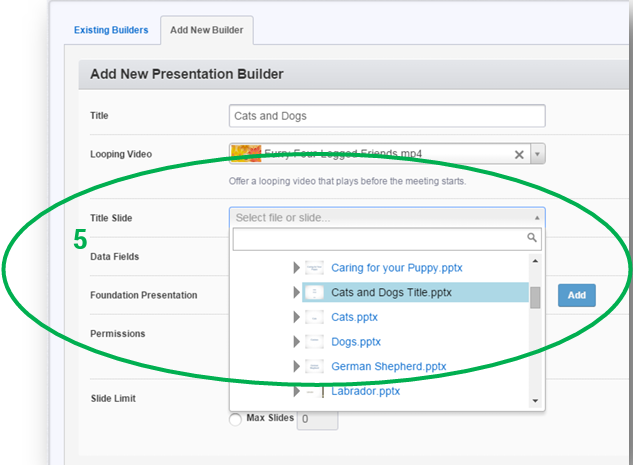
Optional: Title Slide & Data Fields
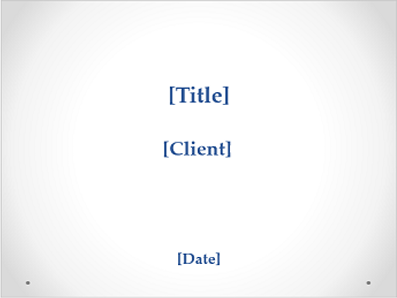
End-users can customize a title slide for their presentation. Insert a formatted Title Slide.pptx in this field.
Create your title slide in PowerPoint. Save a one slide PowerPoint file, e.g. Cats and Dogs Title.pptx, with the data fields as text in brackets. Each field is a separate text box. In this example, the Data Fields are: Title, Client and Date
The Data Fields on the slide, must be identical to the Data Fields in Shufflrr.
Upload Cats and Dogs Title.pptx to Shufflrr.

Click in the Title Slide browser window, and insert your title Slide, e.g. Cats and Dogs Title.pptx
-
Optional: Data Fields
The data fields you input in Shufflrr, must match those on the PowerPoint slide exactly. The case and syntax must be the same, no spaces. To enter your data field, keyboard click comma “,”

Notice how the Data Fields in Shufflrr’s builder match the Data Fields on the PowerPoint title slide created earlier.
-
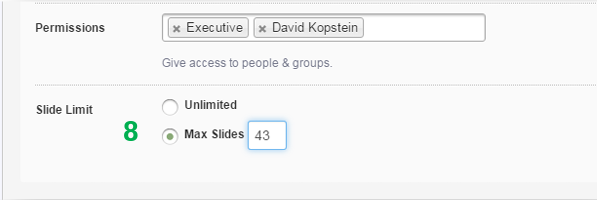
Assign Permissions: Determine which groups are individuals get access to a Presentation Builder. You can assign permissions by group and by individual users.
Go to Permissions > Type in the name of the group or user. Press enter.

-
Slide Limits: You can control the number of slides an end-user puts in his presentation. If he tries to go over the Slide Limit, the Presentation Builder will alert him with a message, pop-up window, and he will be prevented from doing so.
Go to Slide Limits > Select Max Slides > Input your slide limit
-
Save: (because it’s so easy to forget!).
The Save button is on the lower, right hand side of your screen.
We recommend Saving throughout the process.
Adding Content to a Presentation Builder
The content is classified into Foundation, Modules, Sub-Modules, Sub-Sub-Modules, Sub-Sub-Sub-Modules, etc. You can build as many levels down to infinity, if you’d like. We will continue to use our Cats and Dogs example, where Cats and Dogs serve as Foundation Presentations, and the modules follow.
-
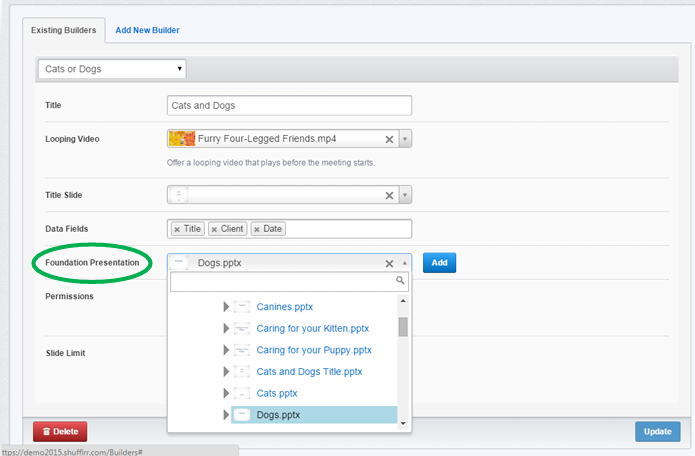
Foundation Presentation:
The Foundation Presentation is the main, required information about a topic, and the modules are optional supporting information. To add a Foundation Presentation to a builder, go to:
Foundation Presentation
-
Supporting Presentation (Modules):
The Supporting Presentation an optional, aka module or sub-topic, that expands upon the Foundation Presentation topic. Users can choose whether or not to include a supporting presentation.
You can put a module under any file in the builder. Modules not limited to Foundation Presentations.
- a) To add a module, choose the higher file, which is either the Foundation or another Module.
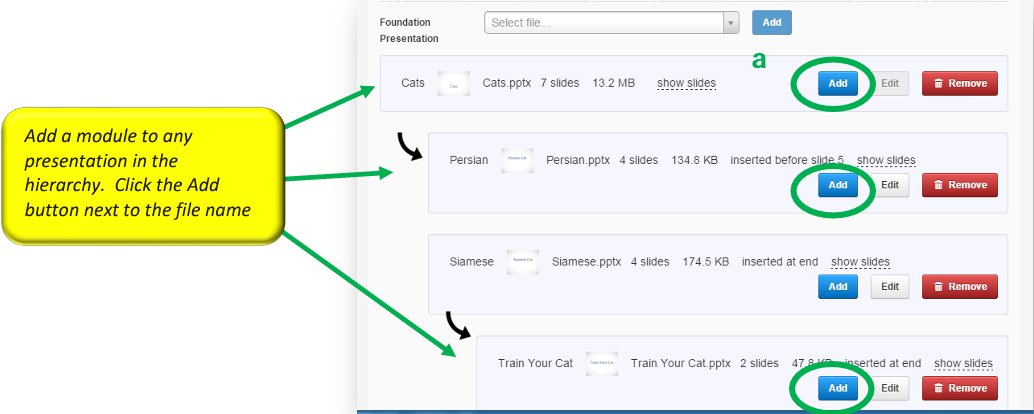
-
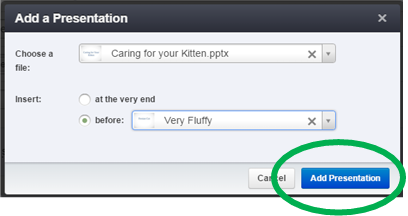
b) A window will drop down.
- i) Browse for the module,
- ii) and then position it within the higher presentation – in front of, at the end, or between two slides.
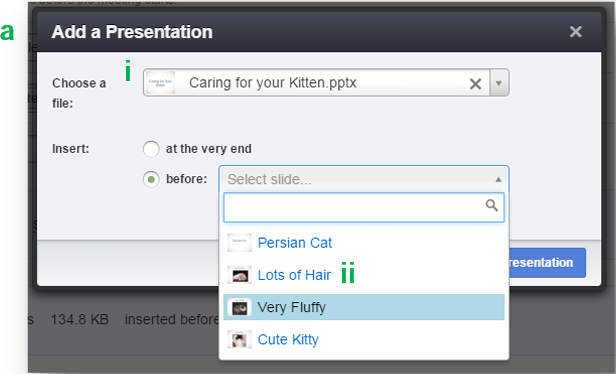
- iii) Click Add Presentation to save the module and add it to the Presentation Builder